Jamf Routines
Jamf recently aired their April 2024 event and dropped a new service (in beta) for business plan customers: Jamf Routines. A no-code automation solution that leverages Jamf Pro’s API clients and webhooks. It’s a curated experience where Jamf is delivering these automations in the form of templates that you fill out a form for and then deploy.
Automation solutions like this are a great tool to have. They run independently from the product so new functionality or features aren’t tied to the product’s releases (specifically, Jamf Pro’s releases). You aren’t running any code of your own, so the operational burden on the Jamf admin is low. And the cherry on top is they’re very easy to start using!
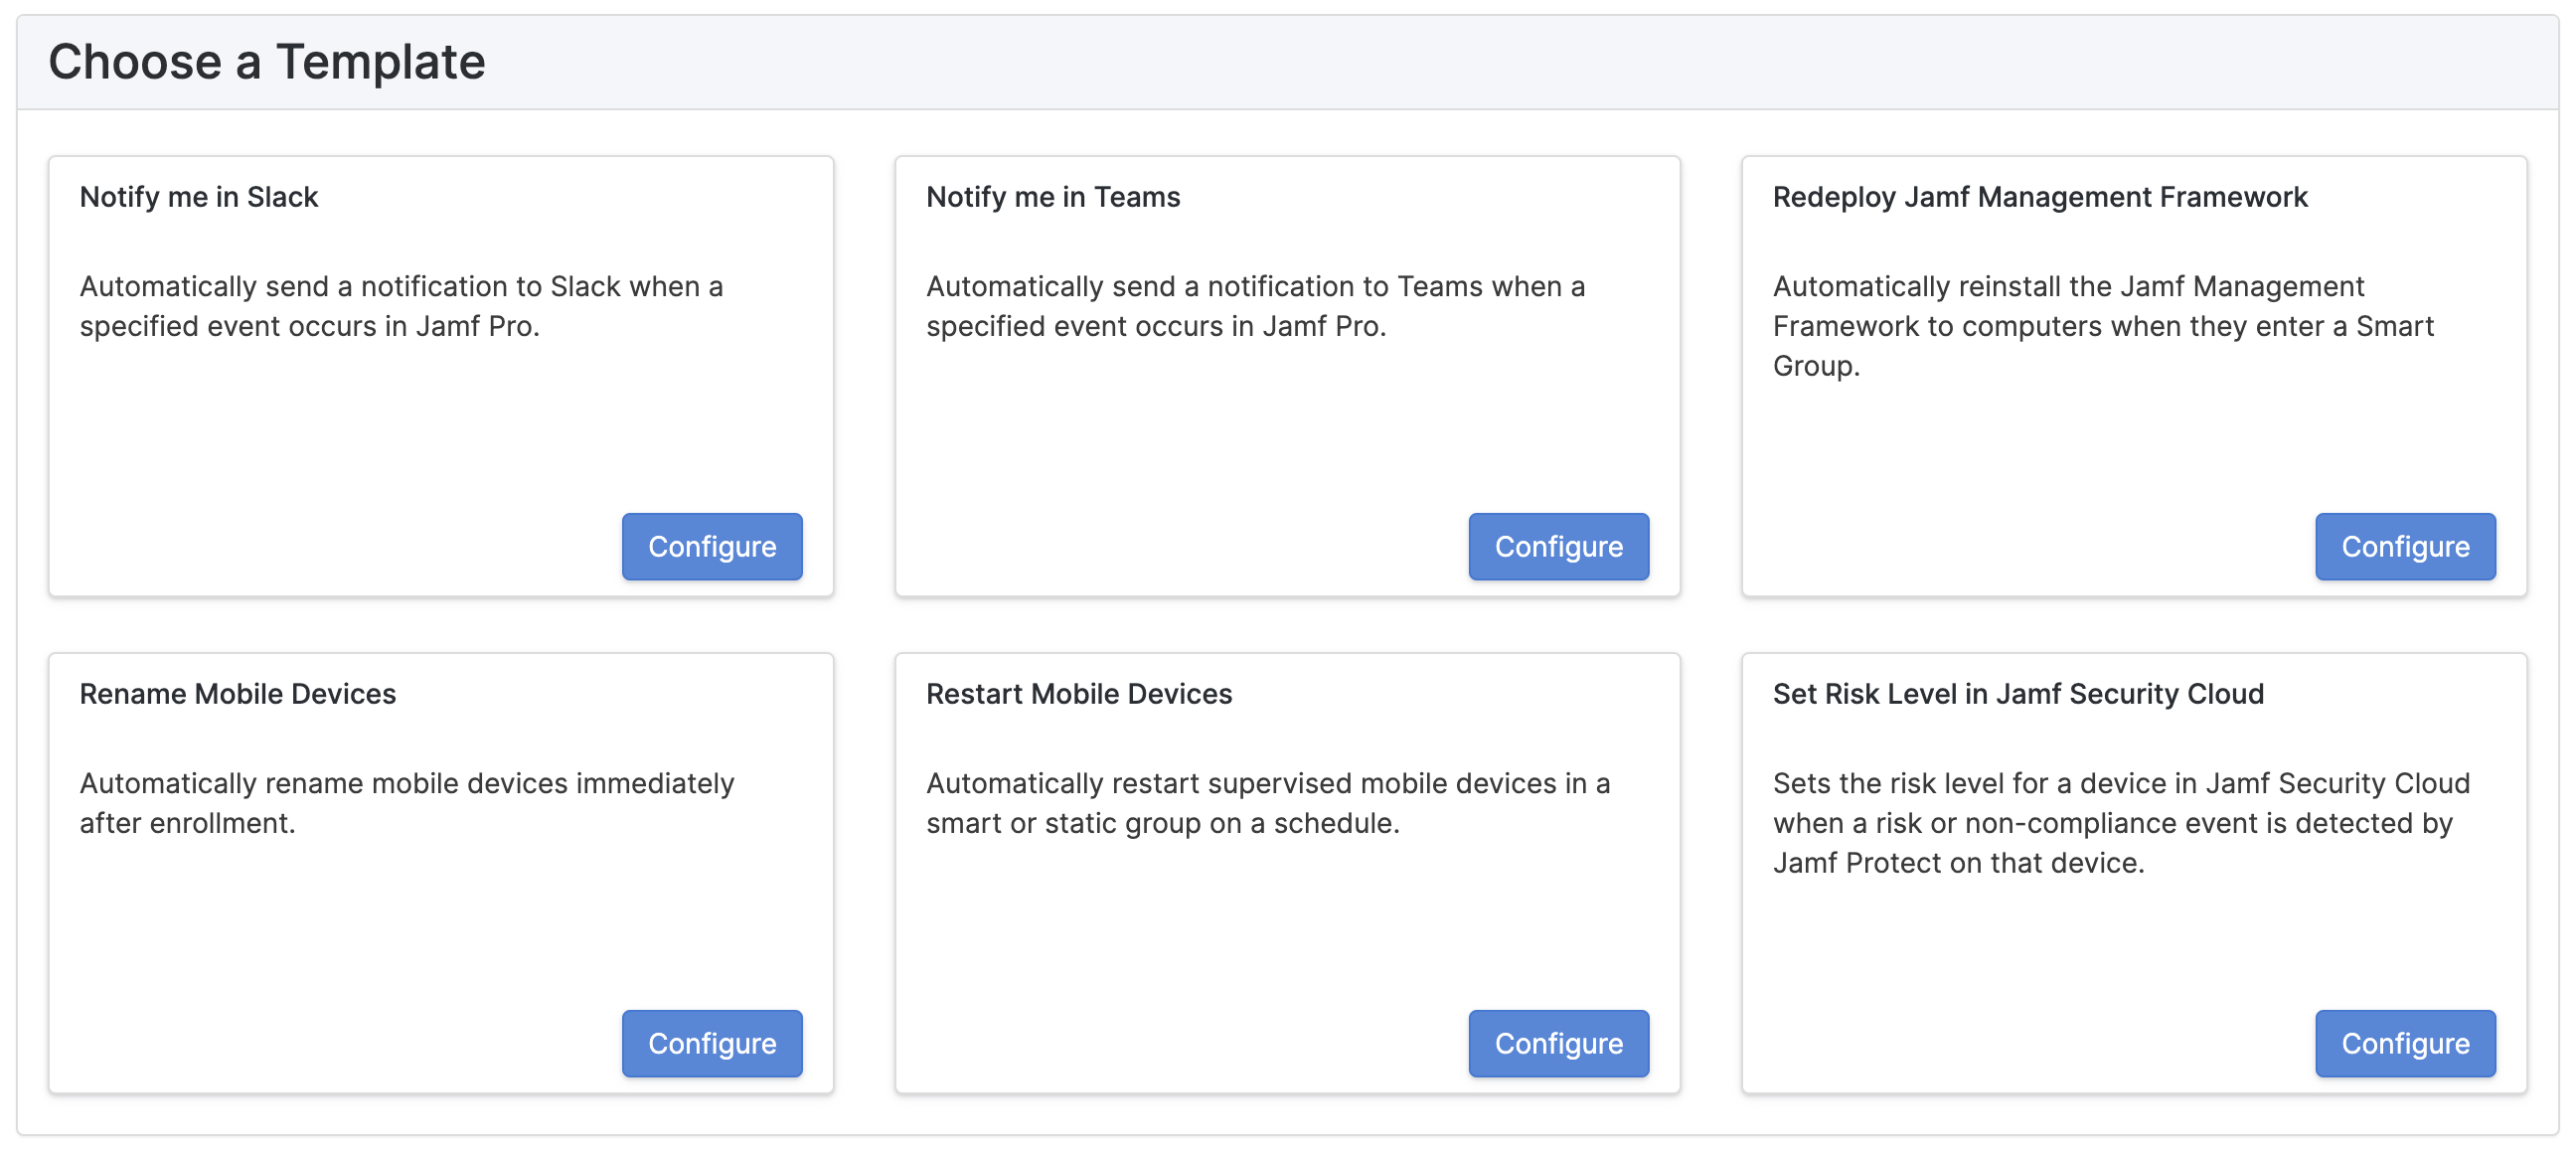
Jamf Routines’ interface is simple and easy to understand. You’re presented a list of your created routines on the main page. Click + Add Routine to be taken to the template picker shown above. Clicking Configure will take you to a form to create your first integration.

It is on this page you can add Jamf Pro servers to use with your routines. You can later view and delete them from the settings page, but you can only add them here. Adding a server requires the URL and an administrator’s login credentials. Jamf Routines doesn’t store these credentials. Instead, it will use your access to create an API role and client in Jamf Pro that it will then store for all future interactions.

The created role grants broad read access to Jamf Pro resources. In addition to these, the API Client has full permissions to manage all webhooks as well as API roles and clients – creating, modifying, and deleting them.
Once the server has been added the form will then populate any contextual options by querying the Jamf Pro API (such as group names inside the pickers). Some routines are event-driven using webhooks. Saving one of these routines will create the webhoook resource in Jamf Pro and it will start working immediately.
Jamf Routines’ use of webhooks here is somewhat inefficient. Each routine will always have its own unique webhook instead of managing a single webhook of that type and then using it across all routines that use it.
This won’t be an issue now with the limited number of routines available, but as this library grows the impact on the Jamf Pro servers could be more noticeable if you’re running ten different automations off an event like
MobileDeviceCheckInwhich would mean each check-in results in ten webhooks sending.
Shortcomings of Routines
Jamf is likely to release new Routines over time, but this service is only providing curated workflows from Jamf’s staff. It’s not clear yet how these workflows are selected for publishing, or what the pipeline to get a customer’s request for some kind of automation into Routines is.
There’s no customization of these routines, either. They are small, fixed workflows with a few preset options. The “Rename Mobile Devices” routine only allows you to pick from the serial number or assigned username with optional prefix and/or suffix. You can’t specify a different value from the device record or a different source. You also can’t filter the devices based on conditions like the prestage they were enrolled with.
Hand in hand with the above, you can’t do anything custom at all. The building blocks are there, but there’s no interface to build your own routines, or any API access to do so on the backend. This limits your use of Jamf Routines to the available templates, providing feedback to Jamf about the routines you want to have access to, and waiting for Jamf to provide.
No-Code vs Low-Code
In the first paragraph I emphasized the term no-code. Jamf Routines is a true no-code solution that offers the utmost most ease of use. If we step down a level to low-code we give up some user-friendliness in exchange for more control and customization.
All solutions are trade-offs. One core idea with Jamf Routines, that you aren’t writing and responsible for running code to make this happen, still translates to other options even if you end up writing some JSON or YAML.
Let’s explore two different workflow automation services that you can achieve this with.
AWS Step Functions
AWS Step Functions allows you to define a state machine as a document or in a visual editor and have the AWS service handle all of the processing for you. It’s an offering that straddles the line of low-code and no-code (but can also be full of code if you get really deep – which we won’t be doing here).
For this post I’ve gone ahead and created a GitHub repository containing CloudFormation templates that will setup and configure all the resources you need to get started with using Step Functions for low-code Jamf automations, and adapted several of the current Jamf Routines as examples.
Step Functions gives you a lot of flexibility in how you want to work. In the GitHub repo all of the files are in YAML format. While not code, it is still kind of code. The difference here is that the YAML files are documents that describe all the operations and are handed to the AWS services which are doing all the actual heavy lifting.
There is a web interface for creating Step Functions built into the AWS console called Workflow Studio. The screenshot below shows one of the workflows (Redeploy Management Framework) open in the editor. Step Functions are very powerful and have a somewhat overwhelming number of options, but with the example templates you will have references that can help you customize and create your own workflows.

This post will not be a deep dive into Step Functions as a service or authoring Step Functions using Workflow Studio or using the Amazon States Language (ASL), but if there is interest that can be a future post.
Create Base Resources
Before creating any workflows there are some resources that need to be in place.
For the workflows that trigger on webhooks there needs to be an URL that Jamf Pro can send to. This will be fulfilled by two AWS services: API Gateway and EventBridge Event Bus. The API Gateway is our HTTP server accepting webhooks. It will publish those directly to the Event Bus which is where workflows will attach to for matching on events. Event Bus is a messaging service that lets you subscribe many different things to events/messages that match a defined pattern.
The states in our workflows that call the Jamf Pro APIs will need to use an API Connection. This is an EventBridge resource that manages authentication to third-party APIs. It handles the creation of access tokens we need to authenticate.
Create a Jamf Pro API Client
You must first create an API client to obtain the client ID and secret values required for the API connection resource. Full instructions are available at the Jamf Learning Hub: API Roles and Clients.
First create a role by navigating to Settings > System > API roles and clients (you will default to viewing the API Roles tab) and clicking + New. Give the role a name and select all the privileges required for the workflows you will deploy. Click Save.
Refer to the table below if you are deploying one of the examples. The Jamf Developer Portal also has pages that list the required API privileges for the Classic API and the Pro API if you are writing your own custom workflows.
Once you have created the role, create the client by navigating to the API Clients tab of the API roles and clients page and clicking + New. Give the client a name, select the role you just created, and click the Enable API Client button. Click Save.
There will be a Generate client secret button on the page for your new client (this button will only be active if the client is not disabled). Click it, and click Create secret on the pop-up. Copy both the client ID and client secret values.
You will not be able to retrieve this secret again. You will have to rotate it, generating a new one, which will invalidate the current.
Deploy the CloudFormation Stack
Download the base_resources.yaml file. Log into your AWS account and go to the CloudFormation console.
Select Create stack > With new resources (standard). Choose Upload a template file and browse for the base_resource.yaml file. Give a meaningful name to the stack, and fill in the URL of your Jamf Pro server (without a trailing /), and the client ID and secret you copied from the previous step.

Click Next, click Next again, and then check all the boxes under “Transforms might require access capabilities” before clicking Submit. CloudFormation will now create the stack and all the resources.
Once the stack reached the state CREATE_COMPLETE you can navigate to the Outputs tab where the values needed for launching the example workflow stacks and creating webhooks will be found.
Create the Workflows
The steps for creating the stacks for the provided example workflows are nearly identical to the steps for creating the base resources. The key difference is that you will need to fill in different parameters. Each template requires the Jamf Pro URL as well as the ARN (Amazon Resource Name) of the API connection. Workflows that trigger on webhooks will need the name of the event bus. You can copy all those values from the Outputs tab of the base resources stack you created!
The workflows that use webhooks will not run until you’ve created the corresponding webhook in Jamf Pro!
Create Jamf Pro Webhooks (As Needed)
You will now need to create the webhooks in Jamf Pro required for the workflows you have created.
Create a webhook in Jamf Pro by navigating to Settings > Global > Webhooks and clicking + New. Git the webhook a name. For Webhook URL copy the value of WebhooksApiUrl from the outputs of the base resources CloudFormation stack.
Set the Authentication Type to Header Authentication. In the text field you need to paste in the following JSON replacing <VALUE> with the value of WebhooksApiKey from the outputs of the base resources CloudFormation stack.
{
    "x-api-key": "<VALUE>"
}
Under Content Type ensure JSON is selected and select the appropriate webhook event. For smart group events you have the option of sending only membership changes for a specific group instead of all.
Now, Experiment!
Once you have created the base resources and one or two of the example workflow stacks you now have everything you need to start playing around with customizing or writing your own! Go to the Step Functions console, select one of the workflows, and then click Edit*. You will be taken into Workflow Studio and can now explore the state machine and modify it as you see fit.

If you make a mistake here don’t worry about it! You can delete the CloudFormation stack and create a new one right away. You can even create as many of them as you want (be careful that you don’t do so in a way where you’re triggering multiple workflows off live events – create a test environment!).
If you want to save your changes click Actions and under Export definition… click As YAML file to download it. This will save as an ASL file that you can load into Workflow Studio or use in a CloudFormation template of your own.
There are two types of triggers for the three examples workflows: EventBridge Rules, and EventBridge Schedules. The rules are attached to the event bus created in the base resources stack that the API Gateway is sending webhooks to. Schedules are as they sound, and template for restarting mobile devices uses a cron job syntax for input.
Here is the rule for the redeploy management framework workflow.
Events:
  Group:
    Type: EventBridgeRule
    Properties:
      EventBusName: !Ref WebhooksEventBusName
      Pattern:
        source:
          - Webhooks API
        detail-type:
          - Jamf Pro Webhook
        detail:
          event:
            jssid:
              - !Ref ComputerGroupId
          webhook:
            webhookEvent:
              - SmartGroupComputerMembershipChange
This is attached to the Step Function resource. The important part is the Pattern* that defines which JSON keys need to be matched on, and then arrays of values to match against.
This pattern is matching source and detail-type against fixed values that the API Gateway sets. The detail will contain the raw webhook body matching the webhookEvent to the exact value of SmartGroupComputerMembershipChange and jssid against the group ID value entered in the stack’s input parameter.
The schedule for the restart mobile devices workflow is even simpler.
Events:
  Scheduled:
    Type: ScheduleV2
    Properties:
      ScheduleExpression: !Sub "cron(${Schedule})"
This is string substitution syntax in CloudFormation. The value for the cron string from the stack’s input parameter is rendered inside cron() which the schedule takes (tip: there’s also a rate() expression that lets you do schedules like rate(5 minutes) or rate(1 hour) if you don’t need to control specifics).
Explore the templates, deploy them in your AWS account, and explore them some more in the console. Experiment and try to create an entirely new workflow or a modified version of an example.
About AWS Costs: All of the resources in this repository are serverless and are charged based on usage. If you don’t use them you won’t incur costs. A rough estimate I have created using the AWS calculator puts the cost close to ~$4.00 per 1,000,000 workflows executions.
Need help?
If you have questions, or encounter an issue with the example templates I have provided in the repository, please reach out to me and I’ll do my best to answer or fix the problem.
Flexli Workflows
There are a lot of automation tools out there, and a wide selection of no-code/low-code workflow services. Over the past year I’ve been building one of my own, and it’s available on GitHub at github.com/brysontyrrell/flexli-engine. It is designed as a fully managed service so the users are not expected to write any code, but instead write JSON documents that describe the APIs and workflows Flexli will work with.
We already covered Step Functions which are incredibly powerful and if you’re an AWS customer you can get started with them now. Don’t worry about reading the rest of this post unless you’re curious.
Flexli’s API exposes two main resources: connectors and workflows.
Connectors define the third-party APIs you want to use in your workflows, with configuration details like credentials and default headers, as well as the events and actions available. You can take the same type of connector, like one for Jamf Pro, and create as many instances of it as you want so you can have workflows that work across many different instances.
Workflows use the events and actions from one or more connectors. You can define a source, which is the trigger, and then the sequence of actions that run after. A workflow can only have one source, but you can use any number of actions across any of your connected APIs.
An example connector and three example workflows based upon the published Jamf Routines (same as with Step Functions above) have been posted in the repository. In the JSON snippets anywhere you see {{...}} it’s a placeholder for a value you would fill in.
To dive into connectors and workflows with Flexli you can check out the user guide and the API docs. This post will only cover the basics for the provided examples.
Creating the Jamf Pro Connector
The example Jamf Pro connector only contains the events and actions necessary for the included examples. The configuration requires an API client just like with Step Functions. The service uses this client to obtain and manage access tokens much like the Step Functions connection resource.
{
	"config": {
	    "host": "{{example.jamfcloud.com}}",
	    "default_headers": {
	        "Accept": "application/json",
	        "Content-Type": "application/json"
	    },
	    "credentials": {
	        "type": "OAuth2Client",
	        "token_url": "https://{{example.jamfcloud.com}}/api/oauth/token",
	        "client_id": "{{Client ID}}",
	        "client_secret": "{{Client Secret}}",
	        "basic_auth": false,
	        "headers": {
	            "Content-Type": "application/x-www-form-urlencoded"
	        },
	        "body": {
	            "grant_type": "client_credentials"
	        }
	    }
	}
}
Connectors can be configured for a variety of authentication methods with enough options to (hopefully) cover the many variations of authentication that exist. Values in default_headers will be applied to every action that’s defined automatically.
Events are straightforward. Each event requires a type which can be any name that’s unique within the connector. I have only defined two for the example. There are more advanced options for additional validation, but here I have mapped the Jamf webhook name to the event type.
{
    "events": [
        {"type": "SmartComputerGroupMembershipChange"},
        {"type": "MobileDeviceEnrolled"}
    ]
}
Flexli’s Events API takes in requests at a path that contains the ID of the connector that’s created. It then matches the type of the event against workflows that use it as a
sourceto trigger them.
Actions map to API operations, or abstract API operations by only exposing the inputs needed for a specific task. Here’s the definition for the Pro API operation GET /api/v2/mobile-devices/{id}. The parameters object is a JSON schema that defines the interface for using this action. The parameters are used in the other elements of (like the path below). The workflow author doesn’t need to worry about the rest of the details, only the parameters required.
{
    "actions": [
        {
            "type": "GetMobileDeviceDetailsV2",
            "method": "get",
            "path": "api/v2/mobile-devices/{device_id}",
            "parameters": {
                "type": "object",
                "properties": {
                    "device_id": {
                        "type": "number"
                    }
                }
            }
        }
    ]
}
Creating the connector returns a unique identifier to it that will be used in the workflows.
Create the Workflows
A Flexli workflow is a single JSON document that defines the source and actions performed in response. If the source is an event type the body of the original request is passed in. The rename mobile devices workflow uses the MobileDeviceEnrolled event type.
{
    "source": {
        "connector_id": "{{Jamf Connector ID}}",
        "type": "MobileDeviceEnrolled"
    }
}
The workflow for redeploying the management framework is a bit more complex. It contains a
conditionthat matches the event against a specific group ID and checks that the list ofgroupAddedDevicesIdsisn’t empty. If a source condition check doesn’t pass the workflow doesn’t run.
The first action calling GetMobileDeviceDetailsV2 is conditional. Like in the Step Function example, the device’s management ID may not be present if the version of Jamf Pro is less than 11.4. This action’s condition checks if the managementId property exists, and if not then the action to read the device record runs.
{
    "actions": [
        {
            "connector_id": "{{Jamf Connector ID}}",
            "type": "GetMobileDeviceDetailsV2",
            "description": "Get the management ID if not present in the webhook event.",
            "order": 1,
            "condition": {
                "criteria": {
                    "attributes": [
                        {
                            "type": "Boolean",
                            "attribute": "::contains(event.managementId)",
                            "operator": "eq",
                            "value": false
                        }
                    ]
                }
            },
            "parameters": {
                "device_id": "::event.id"
            },
            "transform": {
                "event.managementId": "::general.managementId"
            }
        }
    ]
}
The :: syntax you see throughout these examples is a marker for JMESPath expressions. This is a JSON query language similar to how XPath is an XML query language.
JMESPath has functions like contains() which returns true/false if the path is found. Inside the function is a path to event.managementId which is a nreference to the worklfow’s data (which at the start is the source webhook data).
The device_id is the one parameter required for the GetMobileDeviceDetailsV2 action (see above!) and is a path to event.id.
The transform at the end writes values back into the workflow data from the API response. This transform is writing the management ID back into the event where it would be expected in an 11.4+ webhook.
The second and last action calls RenameDeviceCommand and passes in the serial number of the device and the management ID (whether it was always included or populated by the previous conditional action).
{
    "actions": [
        {
            "connector_id": "{{Jamf Connector ID}}",
            "type": "RenameDeviceCommand",
            "order": 2,
            "parameters": {
                "device_name": "::event.serialNumber",
                "management_id": "::event.managementId"
            }
        }
    ]
}
Explore the Examples
I recreated the same three workflows for Flexli as I did with Step Functions. Check out the redeploy management framework and restart mobile devices workflows for some of the other features of the workflow schema. Read the user guide and check out the API docs (linked at the start of the section) to learn more about Flexli’s workflow capabilities.
If you’re using an editor like Visual Studio Code you can reference the JSON schema files for connectors and workflows to enable auto-completion while experimenting.
If you want to learn more about Flexli Engine and its development please reach out to me.
Appendix
Jamf Routines API Role Permissions
- Create Mobile Devices
- Read Mobile Devices
- Update Mobile Devices
- Read Smart Mobile Device Groups
- Read Static Mobile Device Groups
- Send Mobile Device Restart Device Command
- Send Mobile Device Set Device Name Command
- Read Computers
- Read Smart Computer Groups
- Read Static Computer Groups
- Send Computer Remote Command to Install Package
- Read Computer Check-In
- Read User
- Read Smart User Groups
- Read Static User Groups
- Create API Roles
- Read API Roles
- Update API Roles
- Delete API Roles
- Create API Integrations
- Read API Integrations
- Update API Integrations
- Delete API Integrations
- Create Webhooks
- Read Webhooks
- Update Webhooks
- Delete Webhooks
